
Integrating XMTP into CyberConnect: A Guide
This article gives an overview of how to combine CyberConnect’s decentralized social network with XMTP’s open protocol for private Web3 messaging.


Table of contents
- Pre-read
- Introducing the problem of communication in Web3
- Integrating XMTP and CyberConnect
- Feature 1: Address resolution through ccProfile handles (ex. ryan.cyber)
- Step 1: Integrating CyberConnect graphql API
- ProfileByAddress (used for getting ccProfile handles and user profile metadata from an input EVM Address)
- ProfileByHandle (used for resolving an input ccProfile handle to the relevant EVM address)
- BatchAddressesFollowStatus (used for getting the follow/following status of profiles relative to the currently connected user)
- Step 2: Adding support for using ccProfile handles as inputs to start a chat
- Feature 2: Filtering conversations based on connection status (follower/following/connected)
- Feature 3: Adding follow/unfollow button to users’ conversations with ccProfile owners
- Benefits of Integrating XMTP into CyberConnect
- Conclusion
Pre-read
What is CyberConnect?
CyberConnect is a decentralized social graph protocol with identity sovereignty for mass adoption and network effects. To enable dApps in building Web3-native social experiences, CyberConnect Social Graph offers developers a robust set of tools to build composable applications utilizing all user-created content and social connections generated on the CyberConnect protocol. To enable programmability and scalability, CyberConnect Social Graph implements a hybrid architecture with Smart Contracts and Scalable Storage Modules.
CyberConnect Social Graph’s smart contracts represent key elements of social data in the format of ERC-721 tokens with the flexibility of customizing them as non-transferable SBTs (soulbound tokens). Three core concepts make up the CyberConnect protocol, namely ProfileNFT, SubscriberNFT, and EssenceNFT. When user A follows user B from their on-chain profile, user A mints user B’s SubscriberNFT. Further, when user A creates a post, they may choose to use EssenceNFT to represent the post and implement on-chain monetization.
The protocol also offers a rich set of customizable and extensible middleware smart contracts for ProfileNFT owners to choose when they want to issue their SubscriberNFT or EssenceNFT. The middleware design enables users to implement Web3-native use cases like “only BAYC holders can subscribe” or “pay 1 ETH to collect my 500 limited edition posts.” To learn more, visit CyberConnect Developer Center or dive deep into our previous tutorials.
What is XMTP?
XMTP (Extensible Message Transport Protocol) is an open protocol and network for secure, private messaging & notifications between EVM accounts. With the XMTP SDK, developers can enhance their applications with a universal inbox for direct messages, notifications, and announcements, or build new tools for dApps, DAOs, creators, and protocols to re-engage users via Web3 messaging.
Introducing the problem of communication in Web3
💡 In previous blogs we covered Getting Started with CyberConnect and gating content through encryption in Web3-Native Exclusive Content Platform
In the current state of Web3, communication between identities is extremely difficult. A stark example of this was when Solend (Solana-based lending platform) attempted to communicate with a whale whose imminent liquidation risked crashing the entire protocol, and
... attempted to communicate with the wallet owner numerous times over the past few days. The DeFi platform put a message on Twitter as well as sent an on-chain transaction with a memo (source)
There are two components required to build this kind of service in Web3. The first is a widely adopted DID system for discovering & resolving identities. The second is a secure & private way to message between those identities.
While CyberConnect offers a decentralized social graph protocol that includes a DID system (built around the ERC-721 compliant ccProfile), it currently lacks a peer-to-peer communication system. Likewise, XMTP offers a decentralized messaging protocol for secure & private peer-to-peer messaging between Web3 identities, yet it lacks a widely adopted DID system. This is where the integration of CyberConnect & XMTP comes in. In this blog post, we will discuss how to integrate CyberConnect and XMTP, specifically for resolving EVM addresses to identities and enabling private peer-to-peer messaging.
One of the key benefits of XMTP is its extensible design, which enables a diverse set of use cases for sending message data between Web3 identities. XMTP also provides a high degree of security and privacy by using encryption and authentication mechanisms to protect message data from unauthorized access.
Integrating XMTP and CyberConnect
For this tutorial, we’re going to modify XMTP's xmtp-inbox-web repo, which demonstrates the core and advanced capabilities of the XMTP client SDK and showcases innovative ways of building with XMTP.
💡 You can find the full code for this tutorial here https://github.com/cyberconnecthq/cc-xmtp-chatapp
We’ll be further adding these additional features enabled by CyberConnect’s ccProfile & API:
Address resolution through ccProfile handles (ex. ryan.cyber)
Filtering conversations based on connection status (follower/following/connected)
Adding follow/unfollow to users’ conversations with ccProfile owners
In short, we’ll be going from this (https://xmtp-inbox-web.vercel.app/)
to this (https://cc-xmtp-chatapp.vercel.app/)
Prerequisites
For this tutorial, you will need the following:
Basic understanding of React.js, GraphQL, and Web3
Have Node.js, NPM, and MetaMask Chrome extensions installed on your machine
Getting Started
We’re going to first start by cloning XMTP's xmtp-inbox-web repo.
git clone https://github.com/xmtp-labs/xmtp-inbox-web && cd xmtp-inbox-web
Next, we’ll install dependencies
npm install
Next, we’ll need to setup .env.local file per the XMTP repo instruction:
NEXT_PUBLIC_INFURA_ID="YOUR_API_KEY"
NEXT_PUBLIC_XMTP_ENVIRONMENT="production"
You should now be able to run the original demo app and see a UI similar to the one at https://xmtp-inbox-web.vercel.app/.
Feature 1: Address resolution through ccProfile handles (ex. ryan.cyber)
Step 1: Integrating CyberConnect graphql API
In order to resolve ccProfile handles to addresses and get follower/following data from CyberConnect’s social graph we’ll be using the graphql API (https://api.cyberconnect.dev/playground)
First, we need to add two dependencies to our package.json:
// For handling graphql requests
"@apollo/client": "^3.7.3",
// CyberConnect SDK for follow/unfollow feature
"@cyberlab/cyberconnect-v2": "^0.0.1-alpha.16",
We’ll instantiate our client using Apollo like so:
// File: ./graphql/api.tsx
import { ApolloClient, InMemoryCache } from "@apollo/client";

export const client = new ApolloClient({
  uri: "https://api.cyberconnect.dev",
  cache: new InMemoryCache(),
});
Next we’ll be adding a few graphql queries
ProfileByAddress (used for getting ccProfile handles and user profile metadata from an input EVM Address)
import { gql } from "@apollo/client";
export const ProfileByAddress = gql`
  query ProfileByAddress($address: AddressEVM!) {
    address(address: $address) {
      wallet {
        primaryProfile {
          id
          handle
          owner {
            address
            chainID
          }
          metadataInfo {
            avatar
            coverImage
          }
        }
      }
    }
  }
`;
ProfileByHandle (used for resolving an input ccProfile handle to the relevant EVM address)
import { gql } from "@apollo/client";
export const ProfileByHandle = gql`
  query ProfileByHandle($handle: String!, $me: AddressEVM!) {
    profileByHandle(handle: $handle) {
      isFollowedByMe(me: $me)
      owner {
        address
        chainID
      }
      handle
      id
      profileID
      namespace {
        name
        chainID
      }
      followers {
        totalCount
      }
    }
  }
`;
BatchAddressesFollowStatus (used for getting the follow/following status of profiles relative to the currently connected user)
import { gql } from "@apollo/client";
export const BatchAddressesFollowStatus = gql`
  query BatchAddressesFollowStatus(
    $me: AddressEVM!
    $toAddrList: [AddressEVM!]!
  ) {
    batchGetAddresses(addresses: $toAddrList) {
      address
      wallet {
        primaryProfile {
          isFollowedByMe(me: $me)
        }
      }
      followings {
        edges {
          node {
            handle
          }
        }
      }
    }
  }
`;
Step 2: Adding support for using ccProfile handles as inputs to start a chat
To start let’s define a simple function for determining whether the user input is a ccProfile handle (all ccProfile handles are suffixed with .cyber
export const isCCAddress = (address: string): boolean => {
  return address.endsWith(".cyber");
};
Next, we’ll modify the AddressInput.tsx file to incorporate ccProfile handles resolution
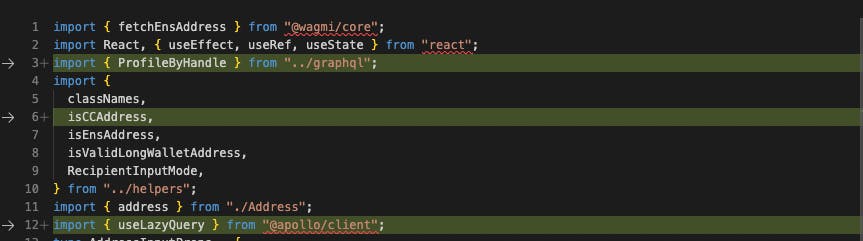
Line 3: Import the graphql query to resolve the handle → EVM Address
Line 6: Import the function needed to determine if the input is a ccProfile handle
Line 12:
useLazyQueryfrom apollo to help execute the query when the component is rendered
Here’s where we add the resolution logic
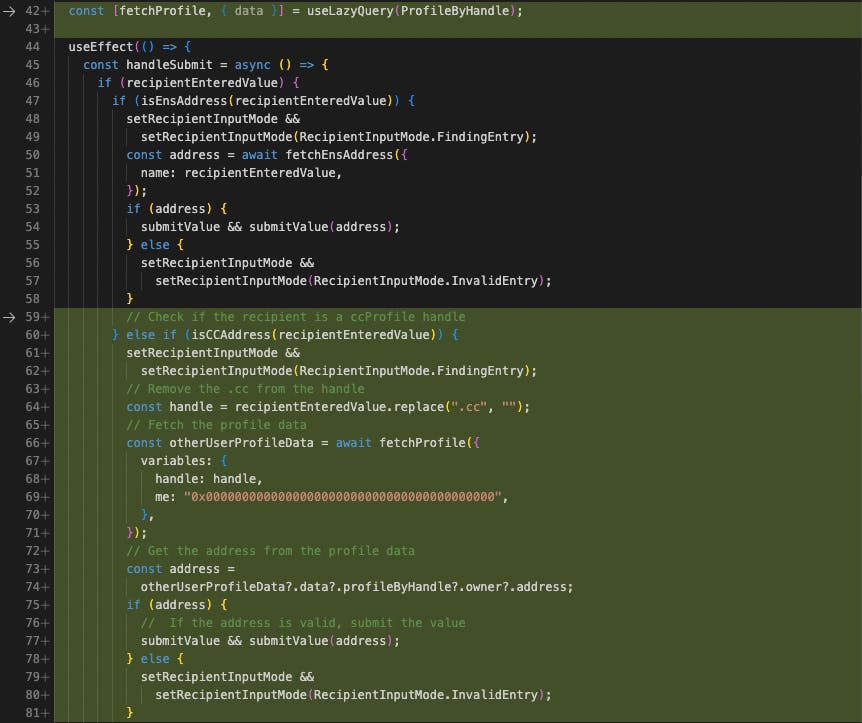
Line 42: Create query function (more details here)
Line 59-81: Add a check on top of ENS resolution to check if the input is a ccProfile handle, if so then resolve it using the query and return/set the address
Awesome! We now support using ccProfile handles to resolve the address
Feature 2: Filtering conversations based on connection status (follower/following/connected)
The second feature consists of adding a dropdown list to the NavigationPanel.tsx to be able to filter users’ conversations based on different conditions:
All (default - all conversations)
followings (accounts the user follows)
followers (accounts that follow the user’s ccProfile)
connects (intersection of followings & followers)
Step 1: Create ListBox component
We’ll first start by creating our ListBox component that’ll be used for filtering. Here we define the four distinct options & respective indices:
const people = [
  { name: "All Messages", index: 0 },
  { name: "Followings", index: 1 },
  { name: "Followers", index: 2 },
  { name: "Connected", index: 3 },
];
We’ll then make use of {Listbox} from "@headlessui/react"; making some minor tweaks to get a dropdown that looks like this (for more detail see https://github.com/cyberconnecthq/cc-xmtp-chatapp/blob/main/components/CyberConnect/MyListbox.tsx )

Step 2: Add Component to NavigationPanel
Now we’ll add a state variable filterMode to the existing ConversationPanel component in the NavigationPanel.tsx file. This variable will track what the current option selected in the ListBox above is and provide a setter function to pass to the ListBox component
// initialize state variables
  const [filterMode, setFilterMode] = useState<number>(0);
We’ll also add the ListBox component and pass in the setter

Step 3: Build filtering logic using CyberConnect API
Now we need a way to filter the XMTP conversations list passed to the ConversationList component based on whether the given addresses are following, followed by, or connected to the current user.
First, we’ll get the unique/de-duped set of peerAddresses (i.e. the people the user has conversations with)
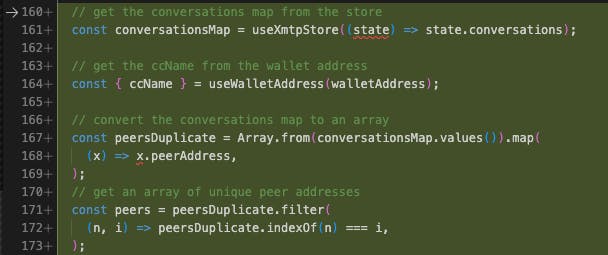
Next, we’ll be using the BatchAddressesFollowStatus graphql query defined above to query those addresses and see if they are followed or being followed by the currently connected user.

Finally, we will build parsing/filtering logic into a useEffect hook which can be found here (https://github.com/cyberconnecthq/cc-xmtp-chatapp/blob/dad323e59852ee6a5e7a634790d80039c251d785/components/NavigationPanel.tsx#L180-L249 omitted here for the sake of brevity)
This hook will be run whenever the filterMode or conversationMap are updated and will correspondingly update the filtered list of conversations which we finally pass to the existing ConversationsList component.
<ConversationsList conversations={filtered} />
With this logic, we are now able to filter conversations based on the follow/following status of current conversations 🎉
Feature 3: Adding follow/unfollow button to users’ conversations with ccProfile owners
Step 1: Create CC client & add Follow / Unfollow hooks

The useCC hook is a helper used to instantiate our cc client. It utilizes the CyberConnect SDK. The code is fairly straightforward, the important section is creating a new instance
import CyberConnect, {
  Env
} from '@cyberlab/cyberconnect-v2';

const cyberConnect = new CyberConnect({
  namespace: 'CyberConnect',
  env: Env.Production,
  provider: provider,
  signingMessageEntity: "CyberConnect & XMTP" || your entity,
});
namespace- Your application name.env- (optional) Env decides the endpoints. Now we havestagingandproduction. (The default value isEnv.Production).provider- The corresponding provider of the given chain.signingMessageEntity- (optional) Use to describe the entity users sign their message with. Users will see it when authorizing in the walletI authorize ${signingMessageEntity} from this device using signing key:. The default entity isCyberConnect.
The useFollow & useUnfollow are almost identical. They create an async request to follow a given handle using the currently connected users’ wallet address.
function useFollow() {
  const [isLoading, toggleIsLoading] = useState(false);
  const cc = useCyberConnect();
  const { address: addressFromWagmi, isConnected } = useAccount();
  const follow = useCallback(
    async (handle: string) => {
      if (!cc)
        return {
          isError: true,
          message: "CC client is not ready.",
        };

      toggleIsLoading(true);
      const error = await cc
        .follow(
          addressFromWagmi || (window?.ethereum as any)?.selectedAddress,
          handle,
        )
        .catch((error) => {
          console.log(error);

          return error;
        })
        .finally(() => toggleIsLoading(false));

      if (!error) {
        return { isSuccess: true };
      } else {
        return {
          isError: true,
          message: "Network busy. Please try again later.",
        };
      }
    },
    [cc],
  );

  return useMemo(
    () => ({
      isLoading,
      follow,
    }),
    [isLoading, follow],
  );
}
Step 2: Create FollowUnfollowButton
const FollowUnfollowButton = ({ handle }: { handle: string }) => {
  const [isFollowing, toggleIsFollowing] = useState(false);
  const { follow } = useFollow();
  const { unFollow } = useUnFollow();
  const { address: addressFromWagmi, isConnected } = useAccount();
  const { data } = useQuery(ProfileByHandle, {
    variables: { handle: handle, me: addressFromWagmi },
    fetchPolicy: "cache-and-network",
  });

  useEffect(() => {
    const checkIfFollowing = async () => {
      const isFollowedByMe = data?.profileByHandle?.isFollowedByMe || false;
      toggleIsFollowing(isFollowedByMe);
    };
    checkIfFollowing();
  }, [handle, data]);

  const handleClick = async () => {
    if (!isFollowing) {
      const { isSuccess } = await follow(handle);

      if (isSuccess) toggleIsFollowing(true);
    } else {
      const { isSuccess } = await unFollow(handle);

      if (isSuccess) toggleIsFollowing(false);
    }
  };

  return (
    <button
      className={
        isFollowing
          ? CyberConnectStyles.followBtn
          : CyberConnectStyles.unfollowBtn
      }
      onClick={handleClick}>
      {isFollowing ? "UnFollow" : "Follow"}
    </button>
  );
};

export default FollowUnfollowButton;
Step 3: Add button to RecipientControl
Finally, we’ll add our new button the RecipientControl.tsx component at the top of the application next to the current conversations’ peer address.
Importantly, we’ll add a condition to only show the button if the current conversation’s peerAddress has a ccHandle . This is important since the Follow feature in CyberConnect is an (EVMAddress) → (ccProfile Handle) relationship. You can read more about it here https://docs.cyberconnect.me/concepts/follow-like-connection .
let follow_unfollow = <div></div>;
  if (ccName) {
    const sanitized_ccName = ccName.replace(".cyber", "");
    follow_unfollow = (
      <div className="justify-right right-16">
        <FollowUnfollowButton handle={sanitized_ccName} />
      </div>
    );
  }
Benefits of Integrating XMTP into CyberConnect
Integrating XMTP into CyberConnect has several benefits. Firstly, it enables secure, peer-to-peer messaging over a decentralized network of nodes. This means that messages are not stored on a central server, and there is no need for a third party to handle messages. Secondly, it ensures that messages are delivered securely to the intended recipient, as the ccProfile handle is used to resolve EVM addresses to identities. Finally, it ensures that messages are tamper-proof, as XMTP uses encryption to ensure that messages are only readable by the intended recipient.
Conclusion
This demo offers a starting point for those looking to add additional functionality to their social dApps built on CyberConnect. By modifying the CyberConnect protocol to include XMTP private messaging, we can ensure that messages are securely delivered to the intended recipient, without any third-party involvement. Enabling secure & private peer-to-peer messaging across nodes in a decentralized social graph is a crucial step towards solving the communication problems in Web3.